Making a 250mm F/4 mirror.
Preface
The travelscope with the 250mm F/6.3 is not used very often, so the idea was to grind the mirror down to F/4 and put it in a rigid tube. This can be mounted on the NEQ6 for wide-field observing and perhaps photography. It is complementary for the 300mm F/16 Dall-Kirkham that is in the planning. This mirror also is a good excercise before starting the more challenging DK mirror set.
One of the goals of this project is to get more accustomed to the use of circular grinding and polishing strokes, especially during the figuring phase. The mirror is relatively thin (18mm) and made of float glass (soda-lime) normally used for windows. Another complicating factor is that his glass has a thermal expansion coefficient that is three times that of pyrex (boro silicate) glass.
So below follow some conclusions I drew about the effects of this stroke. The circular stroke technique has been advocated by Peter de Baan on his blogspot. A small video of how this stroke works during the polishing phase can be seen here.
Circular polishing strokes
In general this method seems to be sufficiently suited to control the action in the different zones of the mirror. I have the impression that due to the inherent circular symmetry it automatically steers away from accidental introduction of astigmatism.
Some observations:
- TOT works inward from the edge, MOT works outward from the center
- Overhang of 25% or lower seems to move towards the spherical equilibrium
- The zone that is over the tool edge gets a marked discontinuity; so vary the overhang a bit
- Wider strokes push the action towards the boundary; so wide MOT deepens the center and wide TOT lowers the edge
- Wide TOT leaves the center relatively untouched, wide MOT leaves the edge relatively untouched
- Adding a center weight with MOT focuses the action towards the center; so do not use during final tweaks
- Keeping those actions in mind, a strategy can be chosen that moves to the desired correction
- Defective intermediate zones are particularly hard to correct, at the risk of a rough figure these can be addressed with a combination of above actions
Model for circular strokes
The following is an attempt to visualize what is actually happening during the stroke. Some day I'd like to refine this model and get to a better quantitative prediction.

|
Looking at what precisely happens during circular strokes, it is interesting to do some calculations to derive the amount of tool-glass contact. This will depend on the radius of the location on the mirror surface as well as the amount of overhang that is used. Every location P(x,y) on the mirror (MOT) describes a circle with radius d, which equals the offset or overhang. For each mirror point at mirror radius r the angle in the circle where contact with the tool commences is defined by angle α. The fractional amount of total contact during one completed circle is given by: FC = 1 - α/180 . It is clear that where α=0, full contact takes place, and where α=180 no contact takes place. The latter would require an overhang larger than the mirror radius though (i.e. >50% diameter), which is impractical. |

|
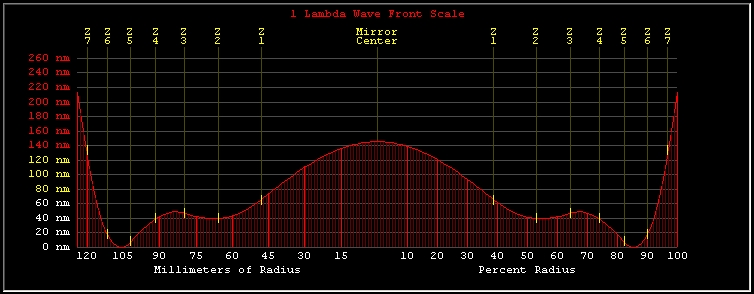
This graph shows the amount of contact depending on mirror radius (x-axis), parametrized with the amount of offset (fraction of radius). Everything is scaled on mirror/tool radius, assuming a full size tool. Now the interesting question is, how does the amount of wear relate to the amount of contact. The speed of all points on the mirror is equal, since its orientation is only very gradually changed during the strokes. The only other differentiator might be that proximity to the tool edge perhaps increases wear? |

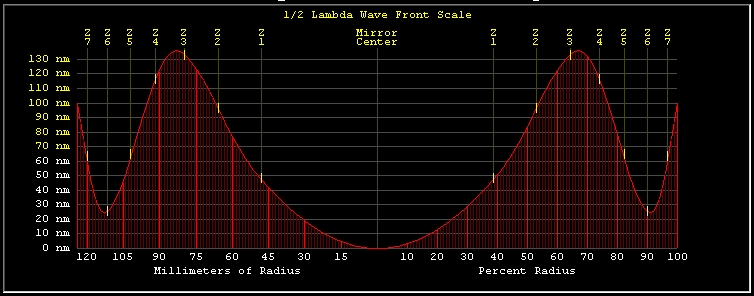
| The amount of correction required for a paraboloid is shown in this graph. Oddly, the shape is not quite matching the contact curve in the previous graph. However, with a combination of overhang values a match can be approached. In any case, variation of overhang should be used to avoid the generation of a sharp edge. In the log below some Foucograms can be found where this effect is very visible. |
1: Grinding
Roughing was a quick job, mostly with #120 and later #180 to minimize the sub-surface damage. Fine grinding followed, going through the grits, concentrating on #320 to get the curve just right and grind away the damage of the coarser grit. Then the #600 and #1200 went quickly up to the pre-polish on pads. The latter helps to significantly shorten the polishing time on pitch.

2: Polishing and figuring
A chronological log of the actions I took as a result of the surface analysis. In the beginning KE testing is primarily used, but when the correction approaches -1 the switch to interferometry was made. Please note that the sessions up to nr 33 should be ignored with respect to other than radial abberations. At this point I found out that the counter-rotation I did before averaging different orientations has been applied in the wrong way. Afte session 34 this is OK.
A note about the percentages: when used to indicate a zone, it relates to radius, when used to indicate overhang it relates to diameter.

|
Towards the end of polishing, the Cave test shows no sign of turned edge. In the mirror the reflection of an aluminium straight edge is visible, and it is still straight at the edge of the reflection. |

|
Under the knife edge the image is a bit different though. There is a low area around the 70% zone. This has been caused by bubbles that formed on the pitch-plaster boundary. These bubbles have pushed up the pitch. Although the bubbles are gone (visibly at least) some additional work has to be done to get a smooth sphere. Parabolization can commence only then. Here also the edge looks good, diffraction all around. Also Schlieren thermals are visible, indicating we're in a less than optimal area for doing optical testing. Go ahead with TOT polishing, circular stroke with 25% overhang. |

|
After an hour of 25-30% average overhang, the trench disappears but the edge appears to be lowering. Accurate measurement of the RoC yields 2018mm, which is only 18mm above target. Parabolization will decrease this with a few more mm. Proceed with TOT polishing, circular stroke decreasing overhang to max 20%. |

| After an hour of max 20% overhang, the trench is almost gone but the edge is still low. |

|
After an hour of average 10-15% overhang, another trench has formed, but the edge is getting better. Mirror appears smoother as well, so maybe it is only now approaching the end of polishing... |

|
After two hours of average 20% overhang, nothing has changed much. I believe that the glass is pretty much polished out now, no pits are visible and water looses adhesion. So next is to attempt to control the surface with MOT strokes from now, after preparing the tool; the grooves need to be opened up again. A thicker CeO mix has also been prepared for this purpose. |

|
Several sessions later, MOT with 20% overhang, nothing has changed much. Final hour with even less overhang does not bring what I want. It seems that the circular moves leave some zones, at least with this mirror. Maybe due to plate and F/4 combination? Next try will be ordinary 30% COC/MOT strokes, while rotating the mirror and walking around the tool. Just to see where it will end: the edge zones have to be good before considering parabolization. |

| After 30 minutes of 1/3 COC MOT strokes you can already see the ridge disappear. What is left is the oblate sphere I usually obtain, so shorten strokes. |

|
After 60 minutes of 1/4 COC MOT strokes nothing changes really, in fact the outer zones appear to become even higher. The one thing that circular strokes prevented, roughness, is now popping up. Plate is very soft... Possibly the slurry also needs to be a bit thicker. --> The short strokes are in fact mistaken, should be longer than 1/3 to bring the edge down. So the next hour will be spent on 1/2 D MOT, don't want to confuse the shape now by changing to TOT. When sphere is achieved it still is a good idea to press and have a short session with 10% overhang circulars, to get the roughness out. |

|
Longer strokes did not change anything, thicker CeO reduced the roughness somewhat. Reverted to MOT circular appr 15% overhang. Center focuses longer, but the edge zones now have a consistent RoC. In fact there are two spheres now. Below same image but focus on the short RoC. 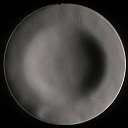
|

|
To deepen the center, the overhang was increased to 25% or so. Picture taken after 30 minutes. It is slowly improving, but apparently the overhang must be increased even more to attack the center more effectively. Next 30 minutes with 30% overhang. Below shows short RoC focus, dome seems a bit softer than above. 
|

|
After a couple of sessions with 25-30% overhang the mirror is mostly spherical. There are some scratches and smudges visible, due to the shape being close to spherical. This is the NULL of the mirror, which means that abberations become more obvious in the test image. Some scratches may go away during the correction phase, or at least become less apparent. Now the parabolization can begin, with 30-40% overhang strokes. |

|
About 20 minutes (16 rounds) with 35% overhang the center starts to deepen. Progress is rather slow, for the time being continue for an hour or so. |

|
One hour with up to 40% overhang, the correction is almost 4mm. This is what the delta RoC between edge and center should be, but the shape is by no means parabolic. The outer 30% zones are still spherical, followed by an area with shortening RoC ending with a central spherical piece. The good news is that the scratch in the center has disappeared. So what to do next? The correction should propagate to the outer regions, which may be achieved by decreasing overhang to under 30%. I will try this for half an hour to see where it goes... Below the view at 3.5mm shorter RoC. 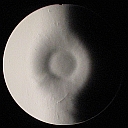
|

| After 30 minutes with 20% overhang, the shape starts to soften and to progress outwards. The central pit is still quite sharply defined and the <70% zones need deepening the overhang should be increased a little. |

|
After 30 more minutes with 25-30% overhang, the shape is softening more and the correction is nearing the edge. To the left an image with the knife edge halfway between center and edge RoC. The delta has now decreased to approximately 2.5mm, so the plan is to polish a bit more with 30% overhang. Maybe it is also a good idea to finish the session without the 1kg center weight, in order to get a smoother surface. Image below shows the knife is at the far RoC, i.e. the outermost zone. 
|

|
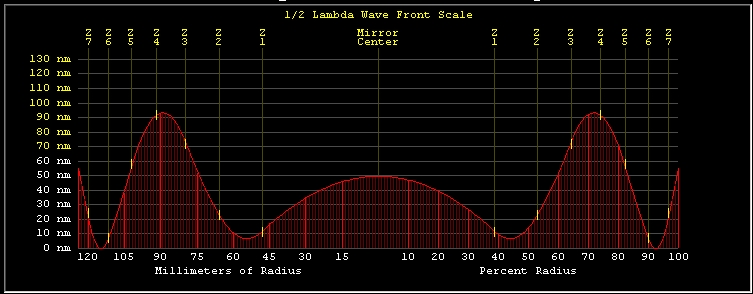
After 30 more minutes with 30% overhang, the shape has propagated more. The knife edge halfway between center shows that this zone has moved outwards slightly. The center now gets a bit too shallow, so strokes should get some more overhang. To prevent the roughness visible in this central area (rings caused by 40% and 30% overhang circles) the overhang should be varied a bit more. I guess between 25% and 45% or so, need to learn on the job. Also it is about time for a first foucault measurement; required is a 7-zone mask (37, 58, 73, 86, 97, 107, 116, 124 mm). Image below shows the knife is at the near and far RoC, i.e. the inner- and outermost zone. Delta R is still about 2.5mm.  
|
Now it is time to keep track by doing figuring sessions and measure with the knife edge. Between sessions long pressing is required and also taking it easy between polish and measure to obtain sufficient thermal stabilization. (It is winter time)
|
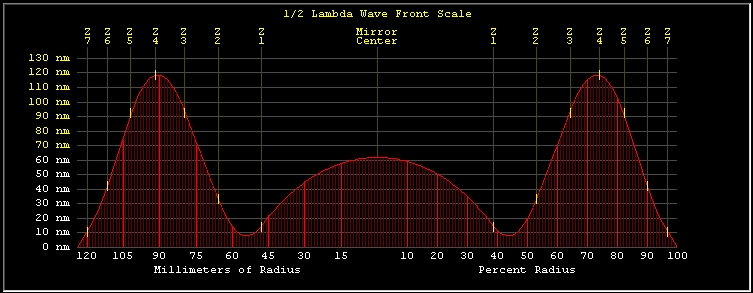
-01- So here is the first KE measurement with the 7-zone Couder mask as specified above. Clearly, the outer parts equire some more correction. With the circular stroke method this should be achieved by deepening the center so that the correction slowly propagates outwards. Hence the plan is to continue the already chosen path, and only vary the amount of overhang to maintain the correct center correction. Regarding the current situation this means that the overhang can be slightly increased with respect to the previous session (to appr 35%). Also, the overhang should be varied a bit to get rid of the rings. |

|
-02- After 30 minutes with approximately 35% overhang (25-40%), keeping in mind that the large overhang cuts faster than the smaller overhang since the worked area is much smaller. Although the central bulghe is coming down somewhat, process is rather slow. Hence the recipe for the next 30 minutes is to concentrate somewhat more on the 40% rounds. |
|
-03- After 30 minutes with mostly 35% overhang (30-40%), the central bulge surely decreased. Next session narrow the strokes again (to around 30%) to gently propagate the correction towards the edge. Below shows the figure when desired RoC is shortened. |
|
-04- After 30 minutes with mostly 30% overhang (25-35%), the central bulge pops up again: apparently it is not the right way to decrease overhang. Other zones are actually following, so next session will continue but with somewhat more overhang. |

|
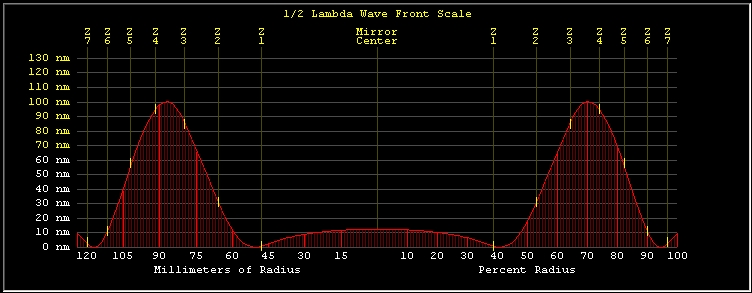
-05- After 30 minutes with mostly 35-40% overhang, the curve is quite overcorrected in the center and undercorrected towards the edge. The work in this session has apparently overshot the intended result. This is probably due to the lap that has been re-scratched before starting. So next try 15 minutes with less overhang, like in previous session when the central correction actually decreased. |

|
-06- After 15 minutes with mostly 20-30% overhang, the center is losing correction rapidly. This would be fine, but the medium zones linger and outer zones still seem to be untouched. Maybe it is just not doable with MOT strokes, and should I turn to TOT for a while. The risk is that a more or less sharp border will form, where TOT work meets MOT work. |

|
-07- After 15 minutes 25% overhang TOT, the edge is now improving while the center is touched less.  So do it one more time! |
|
-08- After another 15 minutes 25% overhang TOT, the 75% zone starts following the edge (see below). The edge itself could use some more though, so the next 15 minutes should widen the stroke somewhat to 30% or so overhang. The goal is to get the edge in shape and then attack the center with wide MOT strokes. |

|
-09- After another 15 minutes 30% overhang TOT, the edge correction improves (below) but the intermediate zones still don't follow. I'd say another round with 25% or so overhang is in order, until the outer two or three zones are OK. |

|
-10- After 15 minutes 25% overhang TOT, zone 7 is untouched, zone 6 and 5 correction have slightly improved. The rest moves around... Next I'll try a narrow MOT session to egalize the central portions. |

|
-11- After 15 minutes 20% overhang MOT, things get worse. Zone 5 correction has gone up again... It is the 0.7radius area, which seems to be notoriously difficult.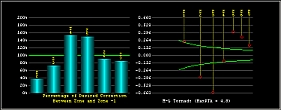 So go for some more TOT instead, again 25-30% overhang, to bring zone 5 down along with 6 and 7. After that, wide MOT to attack zones 1..4 from inside out. |
|
-12- After 15 minutes back to 25-30% overhang TOT, zone 4 is slowly coming down. But the center looks quite bad right now. Next, one more round of up to 30% TOT, followed by a few minutes wide MOT moves to deepen the center as well. |

|
-13- After 5 minutes 40% MOT with 1kg weight followed by 15 minutes 30% TOT, the curve is getting there. The center could still use some work, with 40% overhang MOT. Maybe a short successive session of 25% TOT would stabilize the outer zones somewhat (as in session 10). Next, 5 min 40% MOT and 5 min 25% TOT. |

|
-14- After 5 minutes 40% MOT with 1kg weight followed by 5 minutes 25% TOT no weight, the central regions are closing in. Zone 4 is still stubborn, probably best treated by lowering the center a bit more.  Next, short 5 min 30% MOT with no weight, to see how the central zones catch up. Let the edge untouched for the moment. Otherwise it's back to 25% TOT to finally get 4 in line. |

|
-15- After 5 minutes 30% MOT without weight, the Z4 hill has moved outward slightly. Looking at the defocused FXP surface error it may be a good idea to continue this for some more.  Next, 10 min 30% MOT with no weight. |

|
-16- After 10 minutes 30% MOT without weight, . 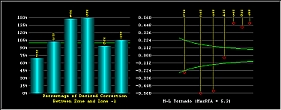 Next, 15 min 20% MOT with no weight. |

|
-17- After 15 minutes 20% MOT without weight, well, overcorrection seems to be moving outward slowly. Probably best to move on like this until overcorrection has gone. Then pick up deepening the center again. Next, 20 min 25% MOT with no weight. |

|
-18- After 20 minutes 20% MOT with 1kg weight, more of the same but the outer zones are hardly improving. Maybe it is a good idea to do 15 minutes of narrow TOT to work the outer half back towards spherical. This should then hopefully not raise the Z4 - 75% ridge again... Next, 20 min 20% TOT with no weight. |

|
-19- After 15 minutes 20% TOT without weight, it seems to be the right treatment. Outer zones are slowly losing correction while the center is relatively untouched. So let's do another 15 minutes to see where it ends then. Next, 15 min 20% TOT with no weight. |

|
-20- After another 15 minutes 20% TOT without weight, the outer zones are still going the right way, center undercorrection is now becoming more prominent in the surface error plot. The M-L figures below are also promising. Next, again 10 min 20% TOT with no weight. Perhaps add a 5 min 40% MOT after that, to push the center down a bit. |

|
-21- After 10 minutes <20% TOT without weight followed by 5min 40% MOT with 1kg, the shape is definitely going in the right direction. The Z5 now seems to be lagging somewhat. Situation is like after session 13 now, but the bump is more outward. Then I chose wide MOT, but now I think it is better to first concentrate on the outer zones. Next, repeat 10 min 10-15% TOT with no weight. Then again add a 5 min 40% MOT, to push the center down. |

|
-22- After 10 minutes <20% TOT without weight followed by 5min 40% MOT with 1kg, the outer zones all fit under 15nm surface error with the right amount of defocus. The two central zones need to be pushed down a bit more, which calls for some wide MOT strokes. Probably not as wide as previous session, since central correction is coming up faster than the rest. Next, 5 min 35% MOT. |

|
-23- After 5 minutes 35% MOT with 1kg, the mirror is diffraction limited for the first time. With some defocus applied, the center is still high, and could do with some not too wide MOT without weight. Remains a high 80% zone, which could be helped with some TOT 25% strokes. Other than that seems to be about time for a Bath! |

|
-24- After 1 minute of 30% MOT with no weight followed by 2 minutes 15% TOT, the Strehl measures 0.97. Based on the surface error graph, a short 15% overhang MOT session is needed to get the edge up a bit, but I'm not so sure about the Foucault readings. It is now definitely time to do some more accurate measurements, both Foucault and Bath, in a more stable environment. Nice job for tomorrow. |

|
The OpenFringe analysis shows about the same as the Foucault test (at best fit conic), which in itself is reassuring. The main observation is that the central region is still quite high, which asks for a few minutes of wider MOT strokes still. Then the outer zones are ramping up, but this should really be reconsidered after the center has been worked down. One other observation from the OF analysis is that the edge seems better than measured at the KE. The igrams need to be taken with some more contrast and fringes next time, the resulting wavefronts were quite noisy. Also, the results for each of the orientations should be similar in terms of quality, before derotation and averaging. |

|
-25- A short 2-minute session of 30% MOT strokes, no weight. The center features a sharp bump, which in fact has risen since last session. So the shape is undercorrected (-0.9) and requires some more parabolisation. The RoC was determined more precisely at 2014mm, while the active diameter is 248mm. The mirror needs some 45% MOT with weight to get rid of the central bump, followed by some wider 30% strokes to get rid of the high center. Ultimately the edge needs to be worked down with wide TOT strokes. |

|
-26- After a 1-minute round of 45% MOT, a 1-minute round of 40% MOT and a 30-second round of 35% TOT. No additional weight was used. The very wide 45% MOT has certainly sorted its effect, de bump is gone now. The short sessions hold a risk of introducing astigmatism, need to carefully avarage out the circular moves. This is visible towards the edge, which in itself has come down a little but the 30 second session is really too short for a smooth result. Some more 35% MOT is required to get the center further down, probably another 2 minute session or so. |

|
-27- After a 2-minute session of 35% MOT, no additional weight was used. At 96% Strehl the mirror should be about done now, but I don't like the bump at the 9:00 position. I wonder whether this is a measurement artefact, caused by lack of randomization before taking the average. Also, the ridge at 25% radius could still be lowered somewhat.
The treatment will be touchy, only a single round of 30% overhang MOT might improve things. It is not the right time to overshoot now! |

|
-28- After a short 1-minute session of 30% MOT, where no additional weight was used. The center has come up a bit, and there is a bit of astigmatism present. Overall, the surface looks more regular though. Will do one more round of 40% MOT, perhaps add some weight. The a round of 35% TOT to correct the edge a bit more. |

|
-29- After one round of 40% MOT (+1kg weight), and one round of 35% TOT. I wonder how to get rid of this stubborn ridge at 40% radius. Probably need to do some more 30% MOT, but now with the weight? |

|
-30- After one round of 30% MOT (+1kg weight). Now just get rid of that pit, this feels like making a pizza bottom. A round of 25% MOT no weight. |

|
-31- After two rounds of 25% MOT, no weight. Shape is getting more regular, although the center pit is still there. The central half of the mirror is sinking as a whole, causing a ridge at 75% radius. I think I will do some more 25% MOT, but need to close with some 25% TOT to get that 75% zone down. |

|
-32- After two rounds of 25% MOT, no weight, and two rond of 25% TOT. We're closing in again, just need to lower the center 1/3 dia. I think just some more 25-30% MOT is needed here, looking at -31- two rounds no weight. |

| -33- After two rounds of 25% MOT, no weight, the surface looks quite promising. It is getting hard to obtain consistent results from the Bath, the variations are as large as the residual abberation. One of the causes of the insufficient contrast could be internal reflections in the Canon A95. At this moment I can do a couple of things; try to get better igrams, test in an other way (e.g. startest) or just call it a job done and have the mirror aluminized... |
  
|
Some Foucault images at roughly 10% 70% and 85% radius. In the middle image you can vagely see the low 50% zone. The bit of structure that is visible around 12:00 (is 45° orientation on the mirror) is some residue left behind after drying. |

|
-34- So after some more analysis I decided to do a bit more center correction. Analysis is after one and a half rounds of 35% -40% MOT, with 1kg weigth. The outer zones get smoother at the cost of a fairly deep central hole. These high overhang strokes with center weight surely are effective, especially with this thin glass! I will give it one more round with some milder MOT, no center weight. |

|
-35- After two rounds of 25%-30% MOT, no weight. Well, this requires some more of that, probably a tad more overhang too... |

|
-36- After three rounds of 35% MOT, no weight. Overshot ... do some TOT 25% to revert in the direction of a sphere. |

| -37- After four rounds of 25% TOT, no weight. |

| -38- After four more rounds of 25% TOT, no weight. |

|
-39- After four more rounds of 25% TOT, no weight. Slowly improving, but a ridge forms around the central pit. |

|
-40- Three rounds of 10% MOT, no weight, pressed with flower shaped insert on center. Correction is decreasing in outer zones, a trench has formed 10% from edge, center flower has no apparent effect. Need some more overhang MOT to restore correction to parabola. Maybe ignore center since it is behind 78mm secondary. 
|

|
-41- Three rounds of 30-35% MOT, no weight. Not much change, need to widen strokes. |

|
-42- Three rounds of 35% MOT, bit of center pressure, increased drag. Center appears deeper, maybe switch to TOT 15% or so. |

|
-43- Four rounds of 20-30% TOT. Center comes up with respect to the outer zones. The ridge around the central pit stays though. Lessen the TOT overhang to move action towards center, it seems it is going to take a couple more sessions until the pit is gone. The analysis is from 4 igrams only and 6th order Zernike smoothing, to gain time: accuracy is less important right now... |

|
-44- Eight rounds of 20% TOT. Switch to MOT now, 25-30% or so. |

|
-45- Four rounds of 25% MOT. This goes the right way, so let's do another four. |

|
-46- Four rounds of 25% MOT. Closing in, do another four. |

|
-47- Four rounds of 25% MOT. Almost there; do another four MOT varying a bit more in 20% direction. Overshoot correction since central pit twists the overall result a bit. Finalize with smoothing TOT. |

|
-48a- Four rounds of 20% MOT. The central pit is coming up now. On one hand some more MOT could flatten this even more. On the other hand the outer areas need to be smoothed as well, and as a side effect the pit could get shallower. In any case, some more careful measurements are also in order, to be absolutely sure about the shape. Now it consists of 4 mirror orientations (0°, 90°, 180° and 270°) with 4 tilt angles in each orientation (45°, 135°, 225° and 315°). Better is to do 8 orientations and 8 igrams each. |
|
-48b- New measurement done, 4 igrams for each of 8 orientations, analyzed with OpenFringe_14_1. Now it is approximately the same figure as in -48a-, but the shape is a bit better overall. Still there are some artefacts resulting from bad igrams. Next measurement maybe more igrams should be taken so that outliers can be ejected. The mirror probably needs one more session with somewhat wider MOT, and then correct the overshoot with TOT. For some reason, the latter has proven to give better circular symmetry. |

|
-49- After 1 round 30% and 1 round 15%, MOT. The measurement has suffered considerably from thermals, due to heating conditions in my garage... Anyhow, I think that two 30-35% MOT rounds are in order, followed by a 25-30% TOT round. |

|
-50- After 2 rounds 35% MOT and 1 round 25% TOT. Almost there, just deepen the center some more with one or two rounds 35% MOT, and attack the small 70% zone ridge with some 15% MOT. |

|
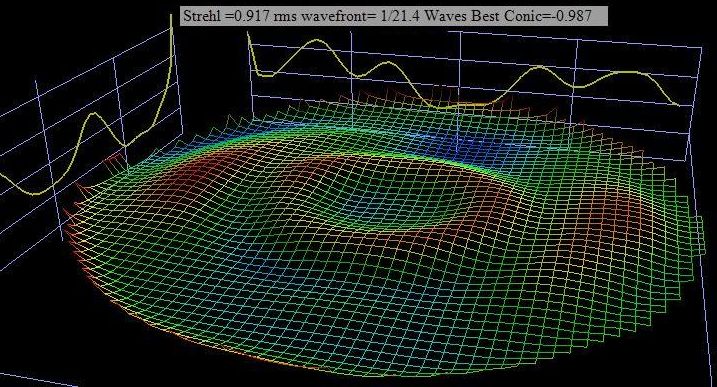
-51a- After 1 rounds 35% MOT, 1 round 15% MOT and 1 round 30% MOT. No pressure, just using mirror weight. So now the question is, do I want to push it further? According to the OpenFringe analysis the mirror is quite good: correction is on target, the Strehl is 94% and the wavefront error is better than λ/20. Certainly some extended interferometer analysis is in place now, maybe using a tunnel to prevent thermals. I think it is time to start with the OTA... |

|
-51b- Re-measured taking igrams in 8 tilt angles for each of 8 mirror orientations. This time I used a cardboard tunnel to minimize air currents, which improved the nr of outliers slightly. The OpenFringe 14.1 analysis of 51b confirms that of 51a, and it even comes out sligtly better. A bit of a downside are the tiny scratches or sleeks I noticed after the last figuring round... |


| -51c- For completeness also some KE shots at 50%, 70% and 90% zones. |

| -51d- Re-measured again, conform 51b process but with a different laser and large collimator. The goal is to see whether a change of setup would yield different results. However, the results are basically identical, which really cranks up my confidence in this test suite of Bath and OpenFringe! |

|
-52-Damn it all! The mirror made an unfortunate but hard contact with the vacuum chamber and chipped off. The coater decided to give it a coat after all, after a quick check of the figure. However, after putting it in the telescope and attempting to collimate/startest it soon became clear that the mirror was not good at all. So a test will be performed with the new Bath. |

| -53-As can be seen the whole mirror has become warped in excess of a wave, due to the stresses released after chipping. There was no visible stress before the mishap, so we can conclude that this type of damage extends beyond teh chip itself. |

| -54-As an academic exercise, I took off the mirror coating and re-measured the surface. The difference with the coated version appears to be very close to zero. I think it may be a good thing to re-do on the new mirror, because this measurement suffers from the big dent on the 135° position. |