Making the 150mm f/3 Gregorian primary
So, 11 Dec 2011 I decided to start the 150 F/24 Gregorian mirror set. First the existing 150mm F/4 needed to be cored, and dug out to F/3.
For this purpose a full size tile tool was made.


The cutter is made according to proven technology, i.e. a wooden disk with metal fins. It hurts a bit to see it scratch the alumminium mirror surface...
Drilling the float glass is like cutting butter, front hole of 11mm is done in 10 minutes or so and a in few more for the backside 4mm. About 2mm are left behind, to be drilled out after figuring.


The tile tool is also made according to the proven method. Clingfoil is clung to the glass, plastic rim setup around it, tiles laid out and cut to size. Then the casting plaster is cast over the tiles and after an hour the grinding may start...
Rough and Fine grind
The grinding starts the same day with #80 carborundum. Hogging out with a full size tool is somewhat slower than with a sub-diameter tool, but I guess that the shape will be more spherical. This proved to be right, and the subsequent #180 and #340 grades are finished quickly. Forgot to bevel the edge though, which hes led to clamshell fractures. Luckily these wer not too deep, and by the time #600 was finished they were almost gone.

Left image is during #600 on 12-Dec, and to the right approaching end of #1200 on 13-Dec. Red-out test shows reflection at about 30°, so we're almost there.
Grinding float glass can be done incredibly fast, apparently the glass is very soft. This will become difficult during the next phase of polish and figure...
Polish and Figure
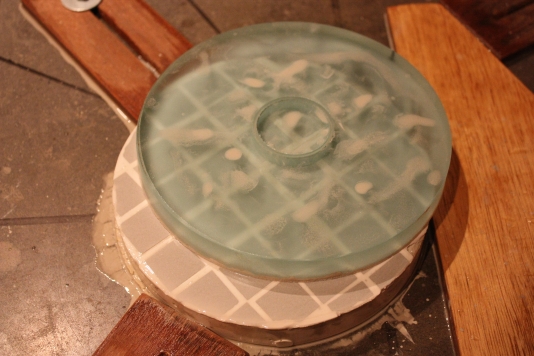
Started polishing phase on Dec 14 by making another plaster disk, just like the fine grinding one but without the tiles. After drying, the pitch was applied as shown below:


The plaster is impregnated with Richards' Secret Sealer Sauce, which is basically pitch resolved in turpentine. This ensures better bonding of pitch to plaster. Then the pitch is heated and, because it is recycled pitch, let it settle for a while to give the hard bits a change to sink. Then it is poured onto the plaster disk, which is quite tricky. You don't want the pitch to leak off, and still need a fairly thick layer. The layer is pressed while still warm, conforming it to the fine ground mirror blank. Finally channels are cut with a 100W soldering iron, with a thin V-shaped thin metal mounted on the tip.
On Dec 26, after a couple of hours of polishing, the mirror is almost there. First foucault images show a slightly turned edge and some sleeks. Also, because of the low F ratio and the low temperature in my garage, the lap has some difficulty to get into contact. Therefore the lap is 'softened' before firguring by adding some more channels. It seems a bit messy on the photo, but in fact the lap acts very well.
On Dec 27 preparations were made to start figuring. First of all, you need a tester to get feedback on the surface shape:


The left gives an overview of the setup, and the right image shows the tester and the returning image of the slit. Unfortunately, the lens of my EOS 450 is too big to get close to the knife edge, so I have to make pictures with the A95 instead.
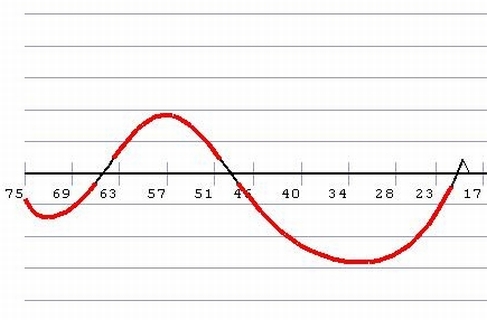
The RoC of the mirror turns out to be approximately 88cm, which is fairly close to the 90cm of the design. The mirror is a good sphere, with a tad of TDE and a small amount of deformation around the central hole. There are some fine scratches, which may go away with further polishing. In order to lengthen the RoC where possible work has been done TOT mostly until now, but will change to MOT for figuring.
See further the figuring log at the bottom of the page.
|
Dec 30, a couple of figuring sessions down the road, the outer zones appear to be quite hard to correct. The central correction decreases in favor of the outer zones correction, using Texereau method 43C, not very rapidly though. Zone differential should be 0.60, so average correction is now 30% with highest values in zones 1 and 2. The A95 is dead, so no photos ... but here's the ugly truth ==> Next, try one more treat of the same and see what the edge actually does. Jan 1st, two rounds of same recipe, but nothing changes much except that the central correction decreases. Also the aggressive method causes some irregularity in the surface. Next session try to spend some more time and smooth the surface with COC and TOT. Maybe also soften the lap before that, to make it conform better and also because the channels are closing up. |

|
|
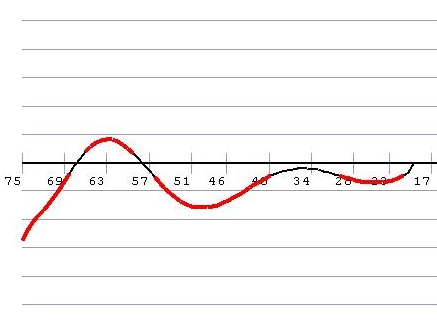
Jan 2nd. No luck, channels are closing up and tool acts too hard, mirror surface is rough. So decided to re-channel and smooth the surface going back to sphere. Jan 7th, gone back to sphere and retry parabolization, see log below. Texereau method of fig.43C is use to flatten the edge a bit quicker, interchanged with classic parabolization, focusing on lowering the edge. So, this works in the right direction, but still more attention should be given to the outer zone. Next time try with Tex 43A with even more focus on COC strokes. Jan 8th, in total two rounds Texereau 43A mostly COC-ish, and one more 43A normal parabolization stroke. Surprisingly, the drag remains fairly constant, unless the rather large deviation from a sphere. May be due to consequent pressing and the small pitch tiles enabling easier conformation. See Figure XP analysis ==> Correction of outer zones is almost there (deltas of >0.5mm), next session start paying more attention to deepening central zones, i.e. 43A with focus on overhung strokes. |

|
|
Jan 14th, two rounds 43A first classic parabolization and then focus on the wide strokes. Delta between zones 5-4 and 4-3 is almost right, and central parts are now catching up. Next time continue with the wide strokes, and also do some long COC only to retouch the outer zone as well. Jan 15th, two rounds of wide 43A to deepen the center, and a bit of long COC to correctthe outerzone as well. Result is that the center has deepened only a bit, but the outer zones have overshot. See Figure XP analysis ==> Next session continue deepening the central zones with 42A and focus on wide strokes. Also, the outer zones should be reduced by doing some TOT short strokes. Jan 16th, one short round of TOT normal stroke followed by a 43A focusing on zone 1. Although the correction moves into the right direction, the center (espe zone 2) must still be further deepened. So the tactic is to do a shortish round of 43A wide (zone 1) gentle strokes, and measure again. Things have not really improved. For some reason, the center does not want to deepen. Next time re-measure before beginning, and if readings are similar, use Texereau brute force method 43C, accented pressure. |

|
|
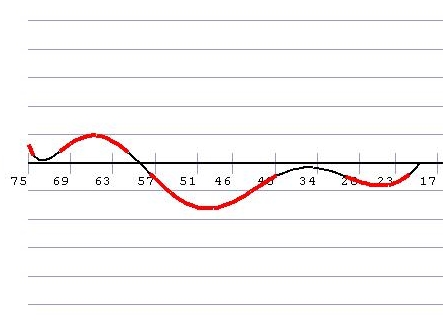
Jan 21st, made a new 7-zone mask (19 - 34 - 43 - 51 - 58 - 64 - 70 - 75mm) to obtain more accurate readings. Look at the difference in Figure-XP analysis ==> Although the readings show similar ballpark trend, the fitted curve is completely different. The new readings show a more turned down edge, and a high zone just within. The center is actually better than in the first measurement, so the plan is to concentrate a shortish session on zones 5 and 6, and see what happens. |

 |
Jan 22nd, re-measured the mirror, readings are similar so confidence is good, the standard deviation is approximately 0.02mm. So the plan is to press well, and indeed bring back the correction of 5 and 6. If things don't work out and the shape gets rough I'll move beyond that towards a sphere.
After two rounds the outer zones are reduced and the edge has improved. Funnily, also the center correction has reduced significantly... Do one more round TOT normal stroke with slight W and measure again.
A few attempts later the conclusion is that the measurements are too inconsistent: back to sphere.
Mar 2nd, the situation after several back to shpere sessions. Based on the photo from Feb 26th (left) some TDE treatment was done. TOT, accented pressure on outer zone, 1/3W with overhang (tex 43C).


On the photo's of today (Canon has repaired the A95, great service!) it seems that the treatment does not help at all! Overall figure may be close enough for figuring, but the edge remains problematic, probably it is more difficult to get a good edge on a fast mirror...
Mar 5th, finally enough time to put in some hard labour, trying different strokes, ultimately leading to the desired spere with a good edge.


The Ronchi shows straight enough lines. The Foucault image, almost pinched-off light to maximize contrast, shows a good edge too. The shape is slightly oblate, but this will be completely swamped by the parabolic correction.
The light spot at 7:30 is caused by the support and stays there when the mirror is rotated. The other brighter spot is some water/cerox residue on the surface.
Started parabolization in the evening, but this progresses slowly. After 30 minutes standard MOT parabolization (43A) strokes total correction is only at 0.6mm (25%). The room temperature might be too low at 18°C: crank it up some more tomorrow.
After four more rounds, correction is at approximately 0.8mm (30%).
Mar 6th, got to serious parabolization today, see log below and FigureXP analysis to the right. Things started to go well when the temperature of the room was increased to over 20°C. The center must be dug out a bit further, correction in middle zones must move outward. Probably best to do center first, but it will be hard to keep overcorrection of zones 2..4 within bounds.


The polishing technique I use is by putting a 500gr weight on the mirror. This makes control of the polishing action much more repeatable, since no pressure needs to be excerted by hands. Foucault photo is after last but one session of today.


|
Mar 7th, another parabolization day. Problem areas are a high center and an undercorrected edge. The center appears hard to do without affecting the middle zones too. Possibly the only way is the use of a sub-diameter tool to get more directed action. Towards the end of the day, I tried correcting strokes, i.e. going back in spherical direction. These arrear to move the correction towards the edge zones, especially the circular strokes. The latter are an interesting alternative, due to their inherent symmetry. You take the mirror on top and move it in a circular way, maintaining an overhang of a cerain percentage of teh disk diameter. I am still struggling to understand how exactly they work, but you can imagine that the most work is done where contact is 100%, while the work gradually decreases outward. This would mean that little overhang corrects the outer zones, where the complementary effect on the lap is slowly propagated toward the center. It seems that 20% overhang would generate a sphere, more would dig out the center and less would correct the edge. Measurements are promising (for the edge) but the center still is shallow. Maybe, if the edge is done, I can focus on the center solely. |

|
Mar 10th, approaching the destination by the end of the day: 95% Strehl.


As can be seen in the figuring log, I got into overcorrection on the 9th and needed to go back towards a sphere. Circular strokes didn't help very much, so two sessions TOT and COC had to be applied to convince the mirror. The parts to lose correction first are (of course) the center. This has been problematic all along, and I guess it is either typical for deep curve or maybe the old pitch has become too hard.
This also brought an opportunity, attacking the center with large overhang circular moves also smoothened the outer parts. Two careful rounds did the trick, but better measurements are required, tomorrow morning...
Mar 11th, new set of measurements shows what happens every time: the center correction is increased and the outer zones decreased. Probably an effect of the rinsing under cold water, cooling the outer regions more effectively.
Anyway, Strehl is now only 85%, I need to push the inner correction outward. Do this gently with 20% overhang strokes, applying no extra weight. Measure after each half round, and let the temp stabilize sufficiently.

End of the day, a number of fine tuning actions later, Strehl is back at 95%. Need to measure again tomorrow morning, if Strehl remains at least at this value I call it done.
Mar 12th, re-measuring shows slight overcorrection in the central zones and undercorrection in the outer zones. Strehl ends up at 94%, a bit less than yesterday. Let's have one more go at smoothing the curve out with a quarter round of 20% strokes. This has resulted in the right effect before (Mar 10th).
Still struggling, ending up at 97% Strehl at the end of the day.
Mar 13th, re-measuring shows that Strehl has dropped slightly and that the edge needs some more correction. A bit of TOT brute force to convince it, a few wide (45% overhang) circular strokes.
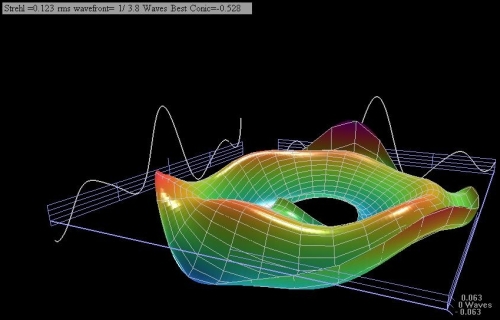
After a few hours of thermal equilibration, the final measurements show a Strehl of 99%. Doing the Monte-Carlo with measuring errors ranging from 0.01mm for zone 4 to 0.05mm for zones 1 and 7: it is very likely that Strehl is better than 95% and surface RMS is better than 10nm. I call the mirror done, except for the coring. I think that the shape needs to be evaluated once more after that has been done. If it is still OK: coat it.


Mar 28th, tried a Bath igram onthe mirror without the core. It turns out considerably less corrected than measured with the Foucault test two weeks ago. Setting the conic to k=-0.86 it gets to a Strehl of 65% and a λ/10 wavefront RMS.
Since it will be quite hard to get a good figure with the core out, I will first see how to get a decent Gregorian system with this conic instead of -0.99.
Apr 2nd, Analysis shows there is no way to get a good Gregorian system with this k=-0.86 primary. So I glued the core back in with plaster, reground (from #320) and repolished the mirror: it is now almost polished out.


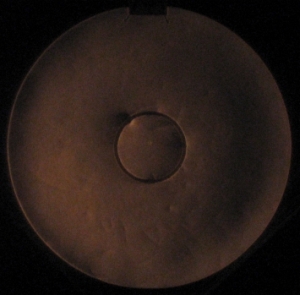
| At the knife edge some issues become visible. I narrowed down the slit to minimize the systematic deviation of the readings, but at the same time it results in a lot more diffractive scatter. You can easily see where the scratches are, which formed today, probably due to a bad bevel. There are also some leftover shallow scratches from the polishing with pads, don't know the cause. I also don't know what the smudge at 11:00 on the inner ring is. Furthermore, the figure is almost spherical, a slight rim shows up inside the edge. The edge itself is not turned down, judging from the strong diffraction ring. In principle I could start figuring, but consider getting is fully spherical first. The scratches will also wear down a little more. The figuring strategy is to get the correction in, not spending too much time in doing foucault readings. If it is nearly there, I will start taking igrams and use OpenFringe for analysis. |
 |
| Apr 5th, it's spherical now, started with parabolization. You can see the remains of the scratches fairly well, although you can hardly see them when investigating the surface under bright light. The hope is that they will wear further during parabolization. The parabolization was started with about 10 minutes 45% overhang circular strokes. A central hole is cut now, but the correction doesn't spread outwards yet. Next time narrow the circles to 35-40% or so. |

|
| Apr 20, went back to sphere again, scratches are more soft now and may disappear after figuring. The image shows the starting point at the KE. I decided to check the surface with the Bath interferometer along teh process, to get some more objective feel for how the parabolization proceeds. |
 
|
After 4 rounds parabolization strokes. One round consists of a single left+right go of parabolisation strokes in 8 different positions. k=-0.18. Right, after 4 more rounds, k=-0.28.


After 4 more rounds, k=-0.35. After 8 more rounds, k=-0.53. Surface seems to be fairly rough, but this may be due to low contrast of the igrams. Most important is to conclude that 4 rounds on average increase correction with approximately 0.1.

Apr 21, after 8 more rounds, k=-0.62. The effect of parabolization strokes seems to slow down.
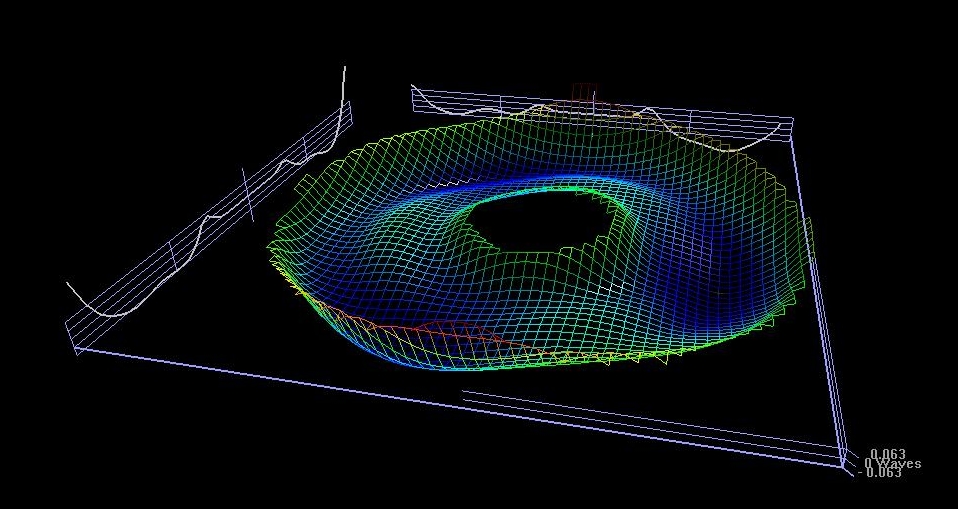
Left image is the igram analysis (relative to conic -0.62), right image the profile over one half mirror. Horizontal scale is in mm radius, vertical scale is in 1/8 wave units. Like with the last attempt, the center and the 60mm zones seem to linger and need some more attention. This could for example be tried with extreme overhange circulars, which appeared to help before. Also, correction is just over halfway in progress, so much more general parabolization is required.

When referenced to the desired correction (k=-0.99) the picture is as below, where the profile vertical scale is 1/4 wave:


Apr 22, after 12 rounds, k=-0.8. Where the high 60mm zone was small relative to overall correction fault, now it is getting more pronounced in the k=-0.99 referenced profile below (vertical scale is again 1/4 wave).


Apr 23, after 12 more rounds, k=-0.78. It is a bit hard to understand what has happened here, expected correction would be better than k=-0.95 or so. Possibly, the intermediate smooting with 10% overhang circular moves has pulled the correction back. Texereau already warns that for such fast mirrors it is very hard to get a parabola with classic strokes, possibly this is the limiting correction you may expect.


After trying circular strokes with 90% radius overhang (4 circles on 8 mirror directions) the correction has increased to k=-0.83. The main effect has been deepening out the center. Also now the Bath interferometer has been readjusted, so that the bright spots are outside the igram. This saves a lot of noise (should have done this before...).


Doing the circular strokes as described above, with 24 more directions, resulted in an avegarge conic of k=-0.98. Although this seems almost spot-on, the high zone at 60mm radius is problematic. The vertical scale of the profile is 1/8 wave in this case.


 |
The wavefront picture on the left also shows the high zone pretty clearly. In this diagram the effect of the supports also shows up. When surface errors become less, this can be canceled out by taking two measurements with mirror orientation 90° apart. The treatment next session will be directed at the high zone, by means of TOT with edge over the zone and located pressure. |
Apr 30, one round of TOT local pressure on edge over outer 30mm. The ridge has decreased somewhat, need about two more rounds and then some center deepening to counter the decreased correction.


Another round of TOT with local pressure on edge over outer 30mm. Followed by a high overhang circular treat (4 directions). You can see the correction of the treated zone decrease relative to the neighbouring zones (75mm and 45mm), so the TOT does what it should do. At the same time I have to regard the overall correction, which now remains stable due to the MOT circulars. I guess that this must be continued, while moving the TOT strokes slightly over the edge to stop it from turning up.


One more round of TOT zonal correction, followed by a full round of high overhang circulars (8 dir), improved the figure. Some roughness emerges along the edge, which needs to be smoothed later. The circulars should use somewhat less overhang to prevent digging too deep a hole.


May 4, picked up the work again with a full round of circulars, 25-30% overhang. This is in fact too little since we can see that the correction has slightly decreased. Overall figure has become smoother though.


One round of edge treatment followed by a full 8 direction circular with 1/3D overhang smoothens the figure:


And once more:


Edge is getting close, so one round circulars 1/3D overhang:


The center is getting deep now, so proceed with one round max 30% overhang circulars, to even out the shape:


Now we're getting there... The bad igrams are taking their toll right now, especially along the edge. Always the igram has low contrast on one side, and the FFT circles overlap. The above igram is an average of three, one rotated 90°. The set below is a single but good measurement, in fact one of the three above:


Here also the edge is a discussion point, but at least there are no big issues with the processed igram itself. The outer regions need some more pushing down, which can be done with a short TOT local treatment, followed by a MOT 20% overhang circular smoothing action.
Measurement done, but igrams failed. The lack of contrast gives too much spread in the results.
May 5, first did a re-measurement in an attempt to get better fringes than yesterday. Contrast is still an issue though, but here's an acceptable one:


Basically, the edge has dropped due to the TOT treat: should have avoided the extreme outer zone. So next goal is to smoothen out again with a round of 25% circulars.


One more round with slightly more overhang circular, 30% or so.

The central smoothing in itself works. Still the ridge remains at 60mm radius, so let's do one more round local TOT treatment, but avoid going over the edge.


The circulars seem to enhance the ridge, need some more aggressive edge treatment followed by some more correction.
May 6, so this morning the edge was attacked with local TOT treatment:


The ridge is less acute now, but the correction has decreased quite a bit, do a round of circular 1/3D overhang.


Almost there, need a bit more correction, after a few TOT licks over the 65mm radius.

One more parabolisation round, circulars 1/3D overhang.


Well, it could be called a done mirror and put an end to the suffering, or have one more go at it tomorrow after taking some more measurements. As can be seen above, there is another measurement artefact, which probably influences the verdict of 73% Strehl and 1/9 wavefront error. The overall figure really should be a tad deeper too, but this is probably swamped in the other errors...
May 7, one more round of parabolisation (yesterday) and remeasuring this morning:


Correction has slightly improved, needs to be propagated to the outer zones by sub-1/3 D circulars.
One round of 25%, one round of 35%, and another round of 25% hangover later:


Although the numbers suggest the mirror is screwed, the curve itself is getting smoother. Looking back, some TOT local work with pressure on the edge over the 65mm zone, might just correct the ridge and bring up the center at the same time. On the other hand this may again introduce roughness...
May 11, after some TOT treatment over the 65mm radius the edge comes down again, of course at the cost of decreased correction:


Rechanneled the lap and did some more rounds TOT with overhanging tool:


May 14, one round of Tex method 43C-I to bring the center down:


One round of Tex method 43C-II to bring the edge down::


May 17, one more Tex 43C-II smoothes the curve but reduces correction to -0.80. Three rounds classical parabolization (Tex 43A, 2xR-L in 8 directions) to increase correction to almost spot on. After accurately re-measuring diameter (149mm) and RoC (884mm) the curve appears overcorrected, the difference is about 0.05! Conclusion is that it pays off to do this in an earlier stage, I've been wrong all along now. See images below:


It can hopefully be brought back with some TOT smoothing, circulars with tool-center over the high zone.
May 19, starting from:


Need to bring the 50mm radius down, by doing some more back to spherical strokes:


while taking care of not turning down the edge.
Some rounds of mild parabolization strokes (classic), and another correction of the RoC of half the beam separation:


May 21, treat the high 50mm zone with some TOT with tool inner-edge over that zone:


Need a little more of this, but first some more correction with parabolization strokes:


So normal parabolization does not seem to work, then do some 45% overhang circulars:


Now a round of TOT edge correction, followed by some more 45% circulars:


slowly getting there, so do this once more:


A little more retouching of the edge and and center, and a more detailed analysis:


The correction strictly is a bit overshot, so the high outer zones could use another lick or two. However, at an 88% Strehl and 1/14th wave I could also call the mirror done...
May 23: it is quite hot this evening, towards 30C, so this needs to be done very carefully. There is a slight bit of astigmatism, top and bottom edges curving upward, left and right sides down. So I decided to do some TOT accented pressure around the 60mm zone, and some more in top and bottom directions. After one round:

Figuring log
Couder mask used: 5-zones (19.0 - 37.5 - 49.5 - 59.5 - 67.5 - 75.0 mm).
For the 150mm F/3 the difference between zone readings should be 0.6mm for 100% correction. Readings are referenced to zone 1, which is set to 0 by default.
| Date: | Action: | Result: | ||||
| 1 | 2 | 3 | 4 | 5 | ||
| 2011-12-30 | (initial situation) | 0.00 | 0.24 | 0.52 | 0.52 | 0.80 |
| 2011-12-30 | 10min MOT, COC, 1/6W, work zone 3 | 0.00 | 0.34 | 0.75 | 0.76 | 0.81 |
| 2011-12-30 | 2 rounds TOT, accented pressure edge over 4+5 | 0.00 | 0.36 | 0.65 | 0.78 | 0.88 |
| 2011-12-30 | 2 rounds TOT, accented pressure edge over 4+5+edge | 0.00 | 0.20 | 0.45 | 0.63 | 0.75 |
| 2012-01-01 | 2 rounds TOT, accented pressure edge over 4+5+edge | 0.00 | 0.17 | 0.33 | 0.52 | 0.61 |
| 2012-01-07 | Tex 43C edge + 43A center (restart from sphere) | 0.00 | 0.19 | 0.41 | 0.58 | 0.86 |
| 2012-01-07 | 43A classic | 0.00 | 0.15 | 0.37 | 0.65 | 0.91 |
| 2012-01-07 | 43A classic | 0.00 | 0.18 | 0.38 | 0.77 | 1.00 |
| 2012-01-07 | 43C edge + 43A center | 0.00 | 0.15 | 0.43 | 0.87 | 1.24 |
| 2012-01-08 | 43A center | 0.00 | 0.17 | 0.39 | 0.84 | 1.24 |
| 2012-01-08 | 43A center + 43A classic | 0.00 | 0.21 | 0.46 | 0.98 | 1.52 |
| 2012-01-14 | 43A classic | 0.00 | 0.28 | 0.54 | 1.14 | 1.58 |
| 2012-01-14 | 43A wide + slight bit long COC | 0.00 | 0.31 | 0.63 | 1.24 | 1.79 |
| 2012-01-15 | 43A wide | 0.00 | 0.37 | 0.83 | 1.44 | 1.97 |
| 2012-01-15 | 43A very wide + bit long COC | 0.00 | 0.40 | 0.90 | 1.60 | 2.25 |
| 2012-01-16 | TOT 1/3 + 43A very wide | 0.00 | 0.59 | 1.07 | 1.69 | 2.33 |
| 2012-01-16 | 43A zones 1+2 | 0.00 | 0.56 | 1.04 | 1.71 | 2.32 |
| 2012-01-16 | 43A zone 1 (thin CeO) | 0.00 | 0.45 | 0.90 | 1.57 | 2.17 |
Log continues with the new 7-zone mask (19 - 34 - 43 - 51 - 58 - 64 - 70 - 75).
The difference between zone readings should be approximately 0.44mm for 100% correction
| Date: | Action: | Result: | ||||||
| 1 | 2 | 3 | 4 | 5 | 6 | 7 | ||
| 2012-01-21 | Re-measured situation of 16-Jan | 0.00 | 0.50 | 0.77 | 1.15 | 1.64 | 2.17 | 2.80 |
| 2012-01-22 | Again, before pressing | 0.00 | 0.64 | 0.89 | 1.22 | 1.77 | 2.32 | 2.87 |
| 2012-01-22 | One turn TOT, 1/3, COC | 0.00 | 0.36 | 0.57 | 0.92 | 1.45 | 1.88 | 2.35 |
| 2012-01-22 | One turn TOT, 1/3, zones 4+5 | 0.00 | 0.27 | 0.48 | 0.92 | 1.33 | 1.85 | 2.22 |
| 2012-01-22 | One turn TOT, 1/3, slight W | 0.00 | 0.31 | 0.56 | 0.91 | 1.33 | 1.77 | 2.25 |
| 2012-01-22 | One turn TOT 1/3 COC | 0.00 | 0.31 | 0.60 | 1.01 | 1.26 | 1.72 | 2.19 |
| 2012-03-06 | Initial reading after restart | 0.00 | 0.40 | 0.74 | 1.10 | 1.23 | 1.38 | 1.42 |
| 2012-03-06 | 2x 43A-III (22°C) | 0.00 | 0.31 | 0.68 | 1.01 | 1.25 | 1.34 | 1.35 |
| 2012-03-06 | 4x 43A-I (20°C) | 0.00 | 0.22 | 0.60 | 0.90 | 1.29 | 1.42 | 1.64 |
| 2012-03-06 | 4x 43A-I (21°C) | 0.00 | 0.29 | 0.75 | 1.36 | 1.68 | 1.82 | 1.93 |
| 2012-03-06 | 2x 43A-III (21°C) | 0.00 | 0.12 | 0.46 | 0.93 | 1.51 | 1.60 | 1.86 |
| 2012-03-07 | 2x 43A-II (21°C), Z1, no weight | 0.00 | 0.29 | 0.59 | 1.07 | 1.47 | 1.71 | 1.90 |
| 2012-03-07 | 2x 43A-II (21°C), Z1-2, no weight | 0.00 | 0.25 | 0.59 | 1.08 | 1.46 | 1.80 | 1.98 |
| 2012-03-07 | 2x 43A-III (21°C), Z6-7 | 0.00 | 0.31 | 0.65 | 1.19 | 1.62 | 1.89 | 2.22 |
| 2012-03-07 | 2x 43A-III (21°C), Z6-7 | 0.00 | 0.21 | 0.55 | 1.09 | 1.61 | 1.91 | 2.13 |
| 2012-03-07 | 15 strokes circular, 40% overhang | 0.00 | 0.22 | 0.67 | 1.23 | 1.66 | 1.90 | 2.09 |
| 2012-03-07 | 2x COC 30% length | 0.00 | 0.24 | 0.53 | 1.07 | 1.56 | 1.87 | 2.07 |
| 2012-03-07 | 1 round circular, 20% overhang | 0.00 | 0.31 | 0.54 | 1.12 | 1.53 | 1.84 | 2.00 |
| 2012-03-07 | 1 round circular, 10% overhang | 0.00 | 0.16 | 0.43 | 0.84 | 1.29 | 1.62 | 1.92 |
| 2012-03-07 | 1 round circular, 15% overhang | 0.00 | 0.09 | 0.37 | 0.77 | 1.22 | 1.70 | 1.92 |
| 2012-03-08 | re-measure last readings | 0.00 | 0.21 | 0.43 | 0.81 | 1.26 | 1.72 | 2.03 |
| 2012-03-08 | 1 round circular, 10% overhang (24°C) | 0.00 | 0.22 | 0.47 | 0.80 | 1.29 | 1.59 | 1.83 |
| 2012-03-08 | 1 round circular, 40% overhang (23°C) | 0.00 | 0.39 | 0.66 | 1.03 | 1.53 | 1.87 | 2.10 |
| 2012-03-08 | 1 round circular, 30% overhang (23°C) | 0.00 | 0.38 | 0.75 | 1.10 | 1.54 | 1.87 | 2.13 |
| 2012-03-08 | 1 round circular, 30% overhang (22°C) | 0.00 | 0.38 | 0.76 | 1.14 | 1.64 | 1.99 | 2.29 |
| 2012-03-08 | 1 round circular, 30% overhang (21°C) | 0.00 | 0.42 | 0.85 | 1.29 | 1.80 | 2.17 | 2.47 |
| 2012-03-09 | re-measure | 0.00 | 0.35 | 0.77 | 1.19 | 1.72 | 2.12 | 2.42 |
| 2012-03-09 | Half a round circular, 40% overhang (24°C) | 0.00 | 0.44 | 0.84 | 1.30 | 1.82 | 2.30 | 2.57 |
| 2012-03-09 | 1 round circular, 30% overhang (22°C) | 0.00 | 0.44 | 0.79 | 1.26 | 1.85 | 2.26 | 2.58 |
| 2012-03-09 | 2 round circular, 30% overhang (20°C) | 0.00 | 0.27 | 0.73 | 1.26 | 1.90 | 2.33 | 2.65 |
| 2012-03-09 | 2 round circular, <10% overhang (21°C) | 0.00 | 0.17 | 0.65 | 1.10 | 1.57 | 2.11 | 2.37 |
| 2012-03-09 | 2 round circular, <10% overhang (22°C) | 0.00 | 0.26 | 0.72 | 1.16 | 1.61 | 2.05 | 2.49 |
| 2012-03-09 | 1 round circular, <10% overhang (21°C) | 0.00 | 0.20 | 0.68 | 1.15 | 1.59 | 2.08 | 2.48 |
| 2012-03-09 | 1 round TOT, D/3 COC (20°C) | 0.00 | 0.19 | 0.67 | 1.09 | 1.55 | 2.04 | 2.38 |
| 2012-03-09 | 2 round TOT, D/3 COC (20°C) | 0.00 | 0.19 | 0.63 | 1.08 | 1.55 | 1.99 | 2.32 |
| 2012-03-10 | re-measure zones | 0.00 | 0.29 | 0.77 | 1.15 | 1.64 | 2.04 | 2.37 |
| 2012-03-10 | 1 round circular, <10% overhang (22°C) + 1 without weight | 0.00 | 0.18 | 0.69 | 1.08 | 1.52 | 1.90 | 2.29 |
| 2012-03-10 | 1 round circular, 35% overhang (22°C) half without weight | 0.00 | 0.26 | 0.67 | 1.11 | 1.49 | 1.91 | 2.32 |
| 2012-03-10 | half round circular, 40% overhang (21°C) | 0.00 | 0.30 | 0.74 | 1.21 | 1.60 | 2.02 | 2.45 |
| 2012-03-11 | re-measure zones | 0.00 | 0.40 | 0.87 | 1.38 | 1.77 | 2.16 | 2.54 |
| 2012-03-11 | half a round circular, 20% overhang, no weight (21°C) | 0.00 | 0.30 | 0.71 | 1.16 | 1.56 | 1.98 | 2.33 |
| 2012-03-11 | 4 circular strokes, 35% overhang, no weight (21°C) | 0.00 | 0.29 | 0.74 | 1.17 | 1.60 | 1.98 | 2.34 |
| 2012-03-11 | 4 strokes 10% overhang + 2 strokes 40% overhang, no weight (21°C) | 0.00 | 0.25 | 0.70 | 1.16 | 1.54 | 1.95 | 2.26 |
| 2012-03-11 | half round circular 30% overhang + 4 strokes 45% overhang, no weight (21°C) | 0.00 | 0.29 | 0.74 | 1.13 | 1.55 | 2.05 | 2.42 |
| 2012-03-11 | quarter rnd 10% ovh + quarter rnd 45% ovh, no weight (21°C) | 0.00 | 0.35 | 0.75 | 1.22 | 1.62 | 2.05 | 2.44 |
| 2012-03-11 | quarter round 35% ovh, no weight (20°C) | 0.00 | 0.38 | 0.77 | 1.20 | 1.58 | 2.00 | 2.41 |
| 2012-03-11 | half round 35% ovh, no weight (20°C) | 0.00 | 0.35 | 0.81 | 1.19 | 1.61 | 2.07 | 2.48 |
| 2012-03-12 | Re-measured zones | 0.00 | 0.43 | 0.87 | 1.32 | 1.74 | 2.11 | 2.51 |
| 2012-03-12 | 1/4 rnd 20% no wt (25C) | 0.00 | 0.33 | 0.74 | 1.14 | 1.66 | 2.00 | 2.38 |
| 2012-03-12 | 5 strokes 40% | 0.00 | 0.40 | 0.83 | 1.26 | 1.65 | 2.07 | 2.38 |
| 2012-03-12 | 2st10%, 2st45%, 2st10%TOT | 0.00 | 0.42 | 0.87 | 1.29 | 1.70 | 2.15 | 2.50 |
| 2012-03-13 | Re-measured zones | 0.00 | 0.41 | 0.81 | 1.25 | 1.69 | 2.09 | 2.50 |
| 2012-03-13 | 5 strokes 40%-50% TOT (circular 43C-II) | 0.00 | 0.42 | 0.85 | 1.28 | 1.69 | 2.13 | 2.54 |
Making the 38mm f/2.4 Gregorian secondary
Blank preparation and grinding
On Mar 13th I started to cut out the secondary from a 8mm thick piece of floatglass. To enable easier handling the diameter was set to 60mm, and the usable part of 38mm was pre-cored from front and back. After hogging out to the approximate depth a tile-tool was made from cut-up tiles and casting plaster, the groove in the blank was also filled up with plaster.

As you can see, it is grinding in miniature, which puts forward its own issues. Your fingers are relatively large, so the best is to only push on the center, with fingertops or even nails. Also the thermal issue, it is addressed during grinding by inserting several layers of chamois.


Roughing and fine-grinding is done in a matter of two hours or so, to make the tooling costs more. After fine-grind a speed polish is done by means of a polishing pad stuck to the tile tool. Pre-polish also takes no time, so a quick test for RoC and surface quality could be done in half an hour.
Polish and Figure
Polishing started on Mar 16th after pouring a proper lap. The polishing is done with a sandwich consisting of a lap, the blank, a piece of chamois and a wooden disk. The latter serves to egalize the force of my fingers and to isolate the glass from the heat.


Mar 18th: Knife edge measurements are also done on a miniature scale, with an RoC of only 180mm and a mirror of effectively only 38mm diameter. Cutting out the Couder mask needs to be done with even more care than normally already required. The focal ratio is also more challenging than with the 150F3 primary, so the foucault photoos are almost impossible to make. The shape of the central part is sort of spherical, and doesn't change much anymore. The outer ring is turned up and may become a problem. Although the focal ratio is steep, the required correction is only halfway towards a parabola. All-in-all, the plan is to start figuring anyway, a log is maintained at the bottom of this page.


Mar 23rd: It appears to be incredibly hard to read the zones. The 4-zone mask on 38mm diameter has holes of only a few millimeters. The mask, the tool, the mirror etc are scaled down, but the eye will not scale accordingly. Also the steep F/2.4 curve makes consistent measurement almost impossible.
The first set of readings (22/03) showed overcorrection in the center. The treatment has been to do light parabolization circular strokes, 25-30%, to move correction outwards.
The second set of measurements, today, show a 97% Strehl curve of k=-0.61 (better curve fit is -0.59). I am finalizing the Bath interferometer version with beam expander, so this fast mirror should be doable tomorrow. Foucault is just too inaccurate in this case.

Mar 26th: I have beefed up the Bath tester, and could do some igrams. To match the steep F/2.4 curve the laserbeam was expanded to 6mm by means of an F/1 film projection objective. It still remains a challenge to get good results, but finally it looks like the Bath analysis actually matches what I can measure with the knife edge.

As you can see, the lateral profile is approximately identical to the FigureXP analysis of the 23rd. The Open-Fringe results however conclude a 1/10 RMS wavefront error and a 65% Strehl, with a best fit conic of -0.5. The foucault test therefore seems to overestimate the correction...
May 26th: After two months of fiddling (refiguring) with the primary, now the time is there to finish this secondary. I re-grooved the tool with double density (i.e. smaller squares) to make it act softer and started some polishing to break it in again. The center was rough and the figure undercorrected, so some smoothing was done before attacking the center again. Target correction is -0.62 .

The interferograms are on the edge of what can be achieved with my current Bath setup. The mirror has a speed of F/2.4, and that is only the part I will use. The whole thing has a 50% larger diameter, and hence a speed of F/1.8. This does not fit in my Bath capability, so while figuring the whole 60mm disk I measure only the central 37mm of it.

In the lower left side you can see the two return spots that need to be shifted out of the way for the igram to be good enough for analysis.
May 29th: After realizing that I only measure the central part and that the whole disk needed more correction things went fast. I did some 40% overhang circulars to get enough correction and not introduce astigmatism (the mirror is only 5mm thick). This overshot the figure and some succeeding 25% overhang circular sessions slowly decreased the correction until finally the figure below was achieved:

The analysis is based on 2 measurements in each of 8 mirror orientations. I don't use Openfringe compensation for beam separation, but filter the system errors out by derotating the wavefronts of the 8 directions and subsequent averaging of wavefronts. The analysis above was then filtered using 10th order Zernike smoothing.
Figuring log
Couder mask used: 4-zones (5.0 - 10.5 - 14.0 - 16.5 - 19.0 mm).
For the 38mm F/2.4 the difference between zone readings should be 0.14mm for 100% correction. Readings are referenced to zone 1, which is set to 0 by default.
| Date: | Action: | Result: | |||
| 1 | 2 | 3 | 4 | ||
| 2011-03-22 | (initial situation) | 0.00 | 0.18 | 0.36 | 0.46 |
| 2011-03-23 | Appr 20 circles 25-30% | 0.00 | 0.17 | 0.27 | 0.43 |
| 2011-03-xx | Target readings | 0.00 | 0.15 | 0.29 | 0.43 |